FLXG Activate SW Login Code
FLXG Activate SW Login Code
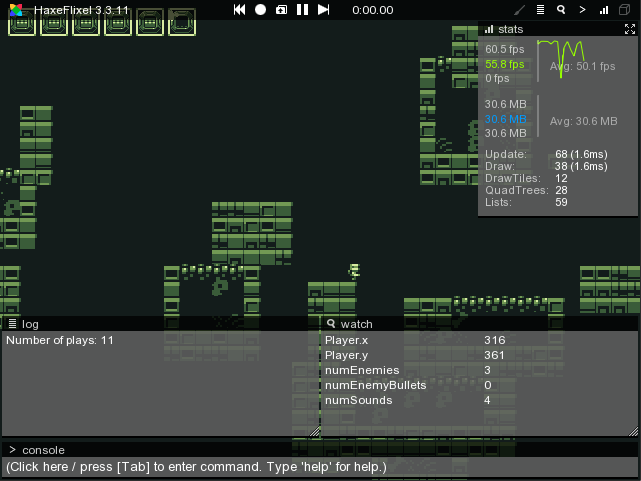
Flixel comes with a fairly powerful debugging overlay. You can open it with one of the default toggle keys (F2, ` and \ with a QWERTY keyboard layout). Note that these are configurable via FlxG.debugger.toggleKeys.
Alternatively, you can do the same in code via the FlxG.debugger.visible flag.
Note that the debugger does not exist when compiling with FLX_NO_DEBUG. With the default Project.xml, this is the case in release mode. On the command line, use the -debug flag to build in debug mode instead (e.g. lime test neko -debug).
Debug draw
FlxG.debugger.drawDebug can be enabled to display the hitboxes of every FlxObject added to the state (alternatively, press the cube button in the upper right corner of the debugger).
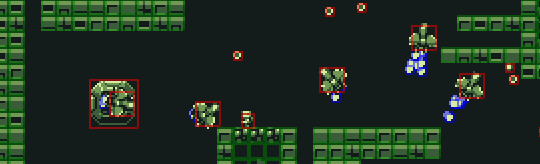
The hitboxes are color-coded based on the collision properties. For FlxObject and FlxSprite this means:
- Blue for
allowCollisions == NONE - Green for
immovableobjects - Red otherwise
The color is customizable via the debugBoundingBoxColor property.
The behavior of tiles in FlxTilemap is slightly different:
- Blue for
allowCollisions == NONE - Green for
allowCollisions == ANY - Pink for other values of
allowCollisions
The Log Window
The log window is used to display traces and can be accessed via FlxG.log. You can also redirect any trace()-calls to it with FlxG.log.redirectTraces = true;. Using it is mostly a matter of preference, some people prefer to have their traces displayed in their IDE of choice (FlashDevelop’s output panel for example).
Some flixel-internal errors will also be output to the log window.
Log styles
It’s possible to customize things like text color, size, style or add a prefix by using log styles. FlxG.log.warn(), error() and notice() use pre-defined log styles.
Here’s an example of how you could differentiate each trace by the player from others by adding a [Player] prefix and printing it in green:
var playerAction = new LogStyle("[Player]", "00FF40");
FlxG.log.advanced(" Shoot", playerAction);
The Watch Window
It’s very common to use trace()-calls to output the value of certain variables for debugging. However, this approach doesn’t scale very well – at 60 fps, tracing the values of multiple variables results in a flood of messages. Breakpoints-debugging is great to inspect a game’s internal state, but doesn’t help when interrupting the execution is not an option, for example when debugging input logic.
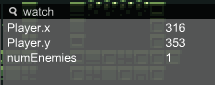
This is where the watch window comes into play. It displays the values of variables using reflection. For example, to keep track of the player’s position:
FlxG.watch.add(_player, "x");
FlxG.watch.add(_player, "y");
The display string does not have to be the same as the variable’s name, “numEnemies” is much more descriptive than “length” in this example:
FlxG.watch.add(_enemies, "length", "numEnemies");
For static variables, you pass the class instead of an object:
FlxG.watch.add(FlxG, "height");
It’s also possible to edit the displayed values by clicking on them, entering a new value in the text field and pressing enter to confirm. This even works with FlxPoint objects.
To remove a watch entry again, simply call FlxG.watch.remove(object, variableName).
Quick watches
Quick watches are a lightweight alternative to a regular watch entry. They don’t require a variable, they simply store a value for a String name. The following example stores the result of FlxG.keys.anyPressed(["UP", "W"]) under the name "Up key pressed" – this is updated every frame since it happens in update().
override public function update():Void
{
    super.update();
    FlxG.watch.addQuick("Up key pressed", FlxG.keys.anyPressed(["UP", "W"]));
}
To remove a quick watch entry, call FlxG.watch.removeQuick(name). Quick watch values can not be modified.
